NOTE: This functionality is limited to the Professional Version of GameMaker: Studio.
To set up your configurations it is recommended that you first prepare a "default" config by incorporating all the configurable assets for the project into GameMaker: Studio, including icons and splash screens (done through the Global Game Settings), included files and any extensions that you may need. Please note that with the included files and extensions, you can select a target platform for them, and that should also be done at this point so that when you create individual configurations it is simply a question of un-ticking those that you don't need.
Once you have set up the default configuration, at the top of the GUI you will see a button marked "Manage". If you click on this it will bring up the Configuration Manager window, as shown below:
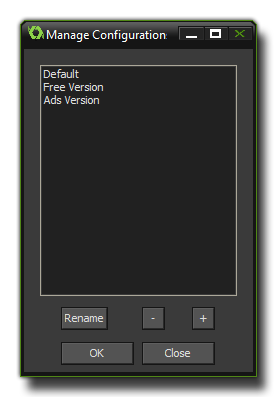 Here is
where you create new base configurations and give them a name
(these configurations are project specific). You can remove
configurations and rename them (note that the "default"
configuration cannot ever be removed or renamed) as well as create
new ones by clicking on the "+" button. If you choose to make a new
one, the following dialogue will be shown: at the bottom which will
bring up the following dialogue:
Here is
where you create new base configurations and give them a name
(these configurations are project specific). You can remove
configurations and rename them (note that the "default"
configuration cannot ever be removed or renamed) as well as create
new ones by clicking on the "+" button. If you choose to make a new
one, the following dialogue will be shown: at the bottom which will
bring up the following dialogue: 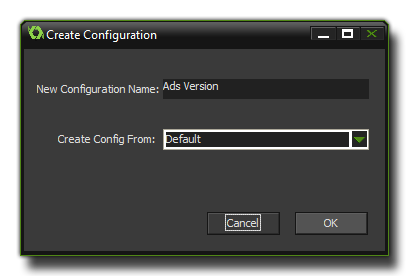 Here you are prompted to choose a new
name for your new configuration and a previous config on which to
base this (usually the default one, but in some special cases you
may need to choose one of your other configs). Clicking okay will
return you to the manager where you can then create more custom
configs or exit back to GameMaker: Studio.
Here you are prompted to choose a new
name for your new configuration and a previous config on which to
base this (usually the default one, but in some special cases you
may need to choose one of your other configs). Clicking okay will
return you to the manager where you can then create more custom
configs or exit back to GameMaker: Studio.Now that you have created your configurations you have to go ahead and customise them so that they actually do change the configurations! For that you should now review the Global Game Settings for each target platform and add or remove icons, splash screens and any other information that is relevant to the configuration, as well as set up the Texture Groups for each configuration. Then you should go through the included files and extensions and tick (or untick) those that are needed too, and if you have set texture groups for each configuration you will also need to go through all the graphics assets (sprites and backgrounds) and re-assign them. Every change you make to these settings will be remembered by the configuration manager and recalled whenever you change configurations.