Actions
This section of the manual outlines what actions
are and how to use them in GameMaker: Studio.
One of the things that makes GameMaker: Studio so unique
is the ease with which simple commands and functions can be made to
manipulate your game world using actions. These actions come
in the form of action sets, with each set having a number of
icons that you can drag and drop into an object event to create
behaviours for that object (this is commonly called just "DnD", in
reference to the drag'n'drop aspect). Here are the action sets in
full: 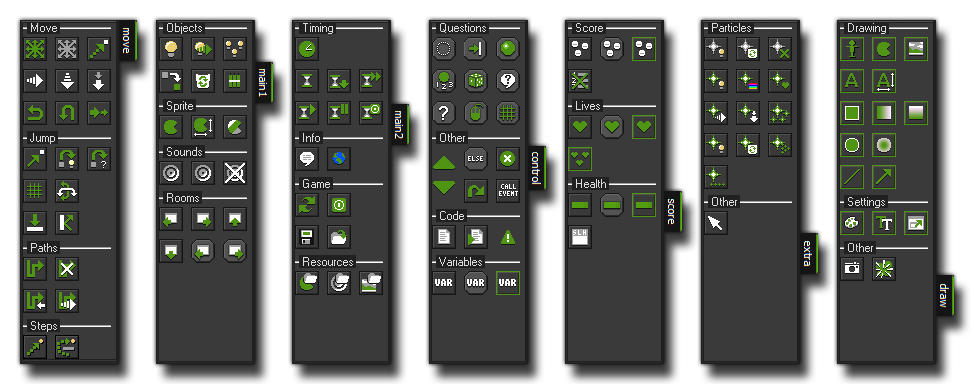
All the actions are found in the tabbed pages at the right of the
object property form, and as you can see there are seven tabs full
of actions for you to use to help create your games. If you require
a brief reminder of what each action does while working with
GameMaker: Studio you can place the mouse over any of them
and a short descriptive text will pop up, and for a more in-depth
explanation each tab is explained elsewhere in the manual (see the
end of this section).
Adding Actions To An Event
To put an action in an event, just drag it from the tabbed pages
to the action list in the object as shown in the image below:
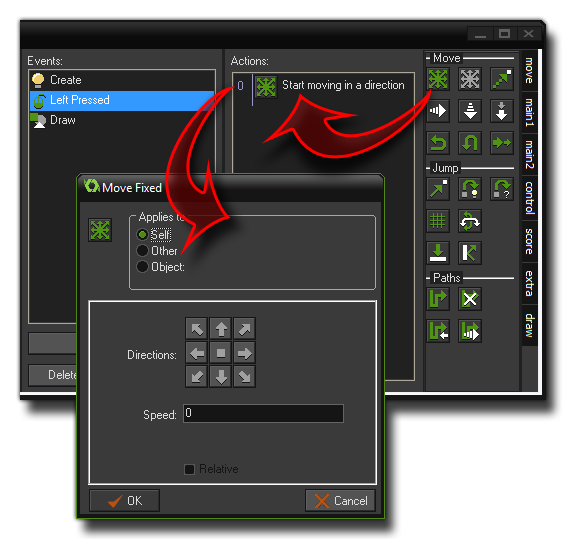
From there you can then edit the details of the action, change the
order of actions within the list (by clicking and dragging), copy,
paste and even delete actions too. You can also select multiple
actions if need be and they can also be dragged or copied from one
object's action list to that of another!
Now, as you can see above, when you drop an action in the action
list, normally a window will pop-up in which you can fill in
certain parameters for the action, and you can find a description
of each of these actions and parameters in the sections of the
manual listed at the end of this page. However, almost all of them
have a two things in common which we will deal with here, the first
of them being the box at the top that says "Applies To:". This is
to tell GameMaker: Studio which instances are to be
considered as "running" this action and the default is
self, which is the instance of the object that has the
action in its action list. Most of the time, this is what you want,
but in the case of a collision event, you can also have an action
that applies to the other instance involved in the collision, and
for that you would change "Applies to:" to other (this is
only valid for the collision event). Finally you have
object which means that the action will be applied to
all instances of a particular object that are active in the
current room. In this way you could change all obj_red_balls into
obj_blue_balls, for example.
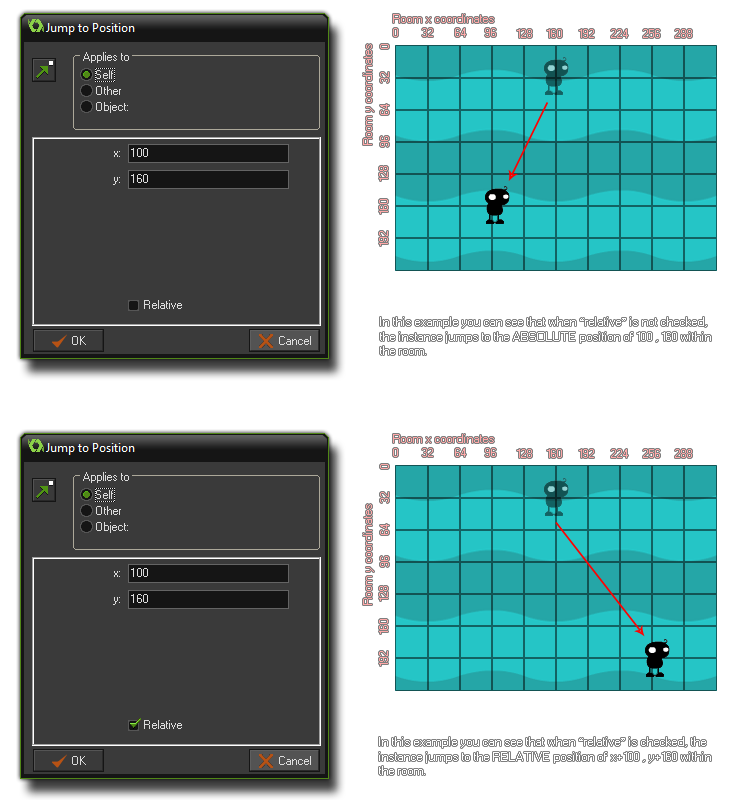
The consistent part of most actions is the check-box labeled
Relative. When you check this box you are telling
GameMaker: Studio that the values you input to the fields of
the action are to be relative to the original value rather than
being absolute. Here is an image to further explain what this
means, and as you will see, checking "relative" can have a big
influence on the result of the action!
Information on the individual actions found in each set can be
found in the following sections:
- Move Actions
- Main Actions, Set
1
- Main Actions, Set
2
- Control Actions
- Score Actions
- Extra Actions
- Draw Actions
- Using
Variables and Expressions in Actions
Bookmarking Actions
When you add actions to a chosen event, these are numbered down
the left hand side of the action list. This is just like when
working with code, where each line gets its own line number, and is
designed to make debugging and finding your way around complex
constructions and action lists. You can "bookmark" a position
within the action list too so that with the press of a number key
on your keyboard you are taken directly to the action that was
previously bookmarked, as long as the object has not been closed
(closing the object properties will clear all current
bookmarks).
To bookmark an action, simply click on it once to select it with
the mouse, then press <CONTROL> + <NUMBER> to
add a bookmark at that point (The number is from 1 - 9 and is any
one of the number keys at the top of your keyboard). It should be
noted that the bookmarks are on a "per object" basis, so each
object can have ten bookmarks as long as it is open for editing.
From the moment you create a bookmark onwards, you can simply press
the number key and you will be taken to the action that the
bookmark references, and if you wish to remove a bookmark, then you
can simply press <CONTROL> + <NUMBER> again
which will clear the number specified.
This functionality can be switched off in the Scripts
Preferences, but note that doing so will also switch off line
numbering for code boxes and the script editor.
Debugging Actions
Apart from the numbers that you can use for bookmarking the
actions used, you can also add break-points to your action
list. Break-points are where you can set the game stop running
while in debug mode, and the Debug Module will show you details of
the current action being run, the variables being used and a whole
host of other details. In this way you can stop your actions from
being performed and then "step" through them to identify the exact
source of the error.
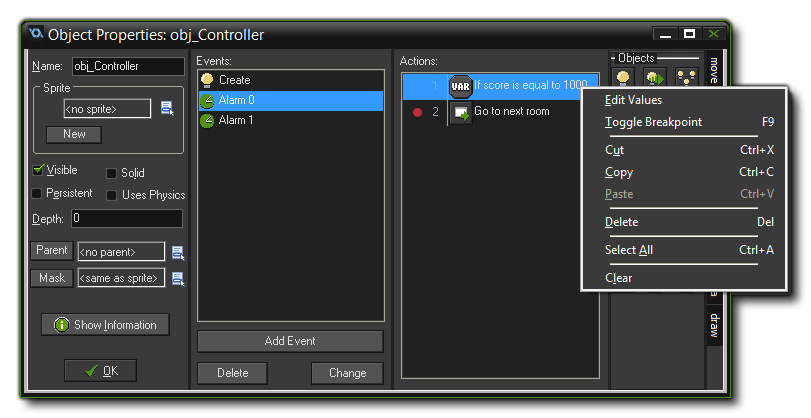 You can add a
break-point (or multiple break-points) by selecting the action from
the list and either right click and select toggle
break-point or by pressing F9 (see image above). The
action will now be marked with a red dot, which means that the
debug module will stop at that point in your game.
You can add a
break-point (or multiple break-points) by selecting the action from
the list and either right click and select toggle
break-point or by pressing F9 (see image above). The
action will now be marked with a red dot, which means that the
debug module will stop at that point in your game.
For further information on how to use the debug module, please see
the section on Debugging.
© Copyright YoYo Games Ltd. 2018 All Rights Reserved