Paths
This section deals with the GameMaker:
Studio path editor.
At some point while creating your games you will need one of
your objects to follow a path through a level. Now, this can be
done by simply creating an array of positions within the room and
then having an instance move between them, but that can be a chore
to set up and is difficult to change, test and adapt for different
instance. For this reason GameMaker: Studio has path
resources and a dedicated path editor.
The basic idea is rather simple - you define a path by drawing it
in the path editor, then you can place an action (or code) in the
creation event of an object to tell the object to follow that
particular path. You can also set the speed to follow the path and
a number of other actions relating to the position and orientation
of the path within the room. Let's start by looking at the path
editor and how that works.
Defining paths
To create a new path resource in your game, choose Create
Path from the Resources menu (or right click on
the path resource and select Create Path), which will open
the following window where you can create a new path (the image
shows a path already created): 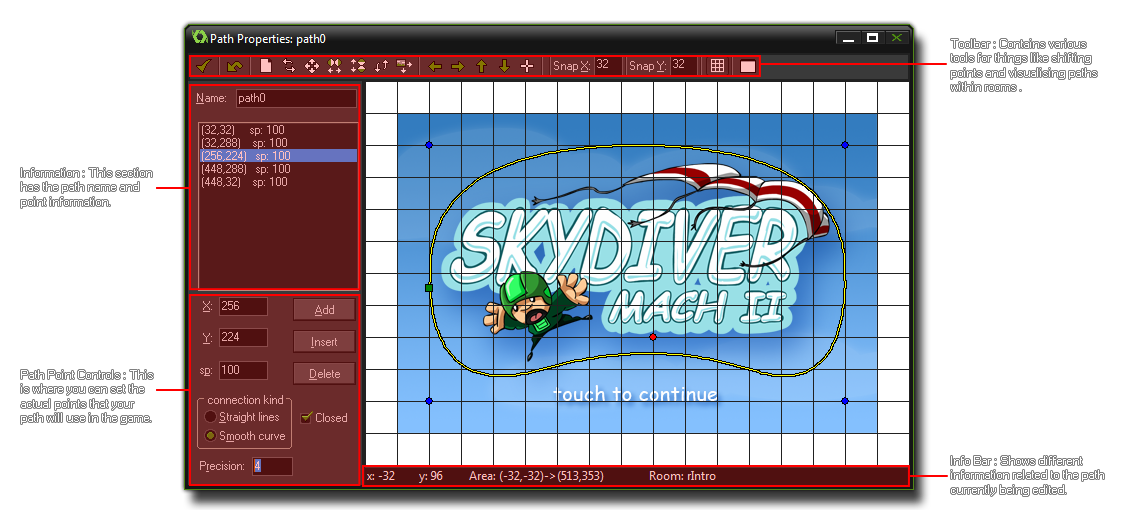 As you can see, most of the path editor
is taken up with the a visual representation of the space your path
is drawn in, but around the edges there are a number of buttons,
tabs and information bars that are there to help you in the task of
creating and changing the paths you make.
As you can see, most of the path editor
is taken up with the a visual representation of the space your path
is drawn in, but around the edges there are a number of buttons,
tabs and information bars that are there to help you in the task of
creating and changing the paths you make.
Path Information
As with all resources in GameMaker: Studio you should
give your new path a unique name as this is what will be used to
identify it throughout the game you are making, and a good system
that a lot of people use is to prefix (or suffix) the resource for
easy recognition in code or actions (eg: path_Enemy_1 or
PowerUp_path). Once you have named the path, you can start
to define it by placing points in the main window on the right.
This is simply done by clicking the left mouse button on a
point where you want the path to pass through, with a green square
signifying the start of the path, a red dot being the current path
point, and a blue dot being a normal path point (the path itself is
drawn as a yellow line). You can click any point of a path and then
drag the mouse to move it around in the editor, although be aware
that the green path start position is not directly
selectable as it changes position automatically depending on
whether the path is smooth or not (more on this further down).
These points are added automatically to the point list
beneath the path name and you can also click on a point in the list
to select it in the main window.
Path Toolbar
At the top of the path editor you can find the tool bar which
has a number of buttons that refer to actions in the path editor:

- Confirm: Clicking this button will close the path editor
and save any changes you have made. Beware, as this will not warn
you that the path has changed, as clicking the close button would
do, but will just save directly any changes you have made.
- Undo: This is a simple, one level, undo button. By one
level, we mean that only the last action performed will be
undone.
- Path Point Actions: These buttons all change the path
points in some way, giving you the ability to clear them
completely, mirror them and shift them.
- Path View Actions: You can use these to pan the view of
the path around (as the path may be bigger than the visible area in
the editor). Note that you can also click and
- Path Editor Actions: Here you can select the snap
resolution for the path points, as well as toggle the grid
visibility on or off. The last button permits you to select a room
to be drawn as a background which can be very useful for giving you
a "feel" for how the path will work in any given game room.
Path Point Control
You can add points to the path using the Add button,
which will add a new point to the path, but at the same
position as the previous path point created (or at the path
start position if none have been created yet). these points can
then be moved by clicking and dragging on them (as can all points
on the path), or by changing the values presented to you on the
left for the X and Y position. you can also set a
speed for individual path points by changing the value in
the Sp box (default value is 100). The speed value is
actually a percentage of the speed at which you make the instance
move along the path, so if you start an instance at a speed of 2 (2
pixels per step) along a path and then one of the path points has a
Sp value of 50, the instance will reduce speed as it
approaches this point to a speed of 1 (50% of the path speed).
Equally, you can set the Spd to 150% and the instance will
accelerate as it reaches the point. In this way you can create some
nice dynamic-looking movement without any code whatsoever!
Beneath the Add button you have Insert and
Delete buttons too. If you select a point on your path
(either by clicking on it in the editor or by clicking the point
list on the left of the editor) and then click on Insert, a
new point will be "inserted" into the path at the same position.
You can then drag this point to get it to the position you wish. If
you click on the Delete button, the point selected will be
removed from the path (there is an undo button at the top of
the screen should you make a mistake).
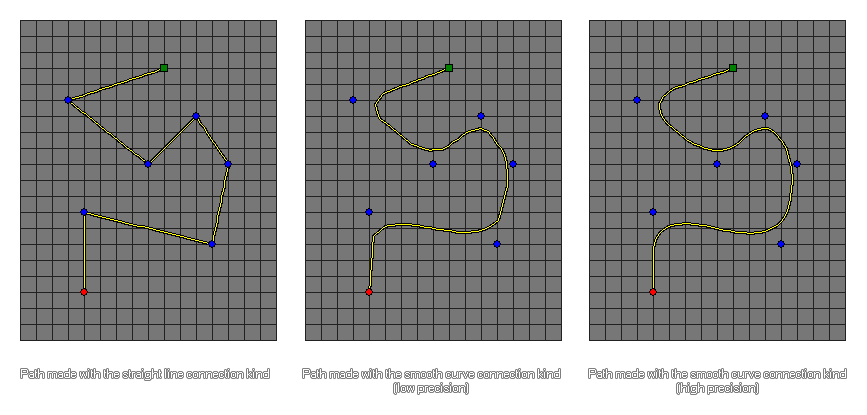
Finally, you can specify the connection kind and whether the
path should be closed or not (a closed path will connect the
last point on the path with the first). The connection kind can be
either straight line, or smooth where a straight line
connect simply connects the points of a path in a linear basis,
with angular changes at each point, while a smooth connection will
create a much softer path that may not pass directly through any of
the points, but rather take an approximate line, creating nice
curves. You can also specify the precision for the curves (default
is 4) which can be from 1 to 8 with 8 being the smoothest. The
image below shows an example of how these options affect the path:
Info Bar
This bar at the bottom shows the x and y coordinates of the
mouse in the path editor, as well as the area of the room visible
in the path editor window. The path editor has a center point (0,0)
and its coordinate system works the same as for the room editor, in
that down is +y, up is -y, right is +x and left is -x, and in this
way you can plot your path around these coordinates. This means
that it can be useful to know what part of this area you are
looking at while designing your path and this is shown by the
Area values, with the first set of coordinates being the
upper left corner of the current view, and the second set of
coordinates being the lower right corner.
Assigning A Path To An Object
To assign a path to an instance of an object, you can use the
path actions (covered in the section Actions
- Move Actions) or you can use code. When using scripts or
pieces of code you have more control over the way the path is
executed, and there are a variety of functions that cover basic
actions like starting the path (see Reference - Paths), and
more complex actions like modifying and changing path points from
within the game (see Reference -
Changing Paths).
© Copyright YoYo Games Ltd. 2018 All Rights Reserved