Android Preferences
The section details the Android device
preferences tab.
 For GameMaker:
Studio to work with Android device, a number of things need to
be set up. First, you must have installed the Android
SDK along with the API packages required for your game to run
(as well as a test device with Android installed), the Android
NDK, and you must also have installed the Java SE
Development Kit (JDK). Once you have them installed and updated
you should set up your Web
Server Preferences before continuing with the configuration of
this tab. You can get up-to-date information on whgat version of
the SDK and NDK is currently required from this helpdesk article:
SDK Version Support.
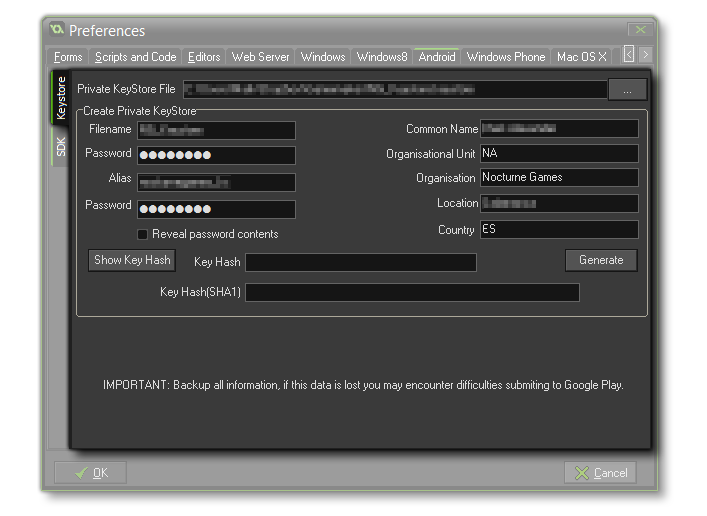
Keystore
The KeyStore is a file that will be used to "sign" all your
Android apps - including those created for the Amazon
Fire target platform - so please fill in all the details
correctly:
- Name: This is the name of the KeyStore file.
Note: This is not your name or the company name, but the
name of the file to be generated!
- Password: Your security password for the KeyStore file
which must be at least six characters long.
- Alias: This is another name that can be used for the
KeyStore file and should be different to the name entered
above.
- Password: The password for the alias file. Should be the
same as the Name password.
- Common Name: This would normally be your name.
- Organisational Unit: The department within the company
that you are a part of.
- Organisation: The name of your company.
- Location: The name of the town or city where you are
based.
- Country: The standard two letter code for the country
where you are based.
Once this information is filled in and you are happy with it,
press the button marked Generate for GameMaker:
Studio to create the necessary KeyStore file. This may take a
moment but once it is finished, you will see that the section
marked Private KeyStore File will have been updated to reflect the
new name that you have given it. Once this is done it normally will
not need to be changed again.
There is a further option here marked Show Key Hash.
Pressing this will generate two special security hash keys directly
linked to your Keystore file that some web sites require for
correct functionality (for example, Facebook, or Google Play for
the Sha1 hash). Should you need this, simply press the button, then
copy and paste the hash keys that are generated.
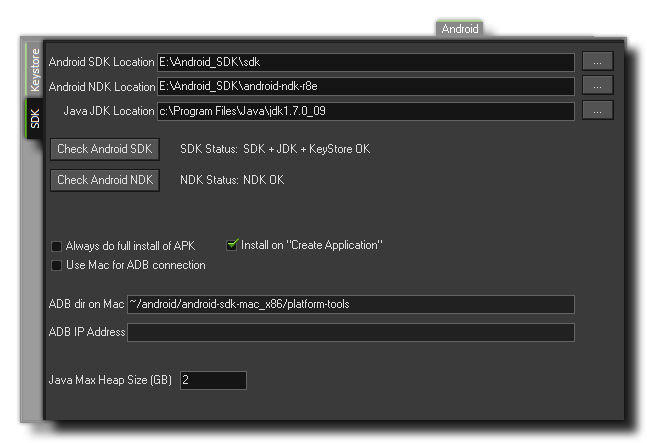
SDK
 The SDK
Tab is where you supply details of the installed components
that GameMaker: Studio needs to compile Android
*.apk files.
- Android SDK Location: The location where you have
installed the Android SDK. This should have been filled in
automatically, but if not then you can use the button on the right
to open a file browser and select the appropriate file
location.
- Android NDK Location: The location where you have
installed the Android NDK. As with the SDK, this should be filled
in automatically but if not you can browse to the file location
manually.
- Java JDK Location: The Location where you have installed
the JDK. This should been filled in automatically, but if not then
you can use the button on the right to open a file browser and
select the appropriate file.
You should click the button marked Check Android SDK, as
this will validate all the information and inform you of any errors
(in which case you should revise all the information to make sure
it is correct). When everything checks out you should receive the
message "SDK + JDK + KeyStore OK".
There are a few final options at the bottom of the tab:
- Always do full install of APK: Flagging this will make
GameMaker: Studio remove any previous runners of your game
from your device, as well as all associated files (for example,
*.ini files) from your test device before installing a new
version of the game.
- Install on "Create Application": When this option is
flagged, compiling a complete *.apk will install it
automatically on any devices that are connected.
- Use Mac for ADB connection: Should you wish to connect
your Android device to a Mac, you can click this option to have
GameMaker: Studio connect to your Mac and test your games
that way. Note that you must have set up the Mac Preferences correctly, have the
Android SDK installed on the Mac and given the correct ADB
directory (see below).
- ADB Directory on Mac: When you have the above option,
Use Mac for ADB connection, enabled you can set the
directory for ADB here.
- ADB IP Address: By default this is blank, but you can
input a specific device IP and use this to force ADB to connect to
that over Wifi rather than over USB for testing (useful for the
Amazon Fire target platform, for example).
- Java Max Heap Size: Set the size of the Java Memory Heap
for the Android JDK
© Copyright YoYo Games Ltd. 2018 All Rights Reserved
 For GameMaker:
Studio to work with Android device, a number of things need to
be set up. First, you must have installed the Android
SDK along with the API packages required for your game to run
(as well as a test device with Android installed), the Android
NDK, and you must also have installed the Java SE
Development Kit (JDK). Once you have them installed and updated
you should set up your Web
Server Preferences before continuing with the configuration of
this tab. You can get up-to-date information on whgat version of
the SDK and NDK is currently required from this helpdesk article:
SDK Version Support.
 The SDK
Tab is where you supply details of the installed components
that GameMaker: Studio needs to compile Android
*.apk files.