Tiles
This section deals with tiles and how to use
them in the room editor.
In many games you will want to have nice looking backgrounds,
made up of many details and that are eye-catching and interesting
to the player. For example, in a maze game, the walls of the maze
should nicely match up, and in platform games you like to see
beautifully drawn platforms, trees, etc. However, to create
hundreds of static backgrounds would take forever, and also not be
very efficient as they would need a lot more device memory, nor
would creating hundreds of individual objects with different
sprites be a very good idea. So, instead, GameMaker: Studio
allows you to use tiles. 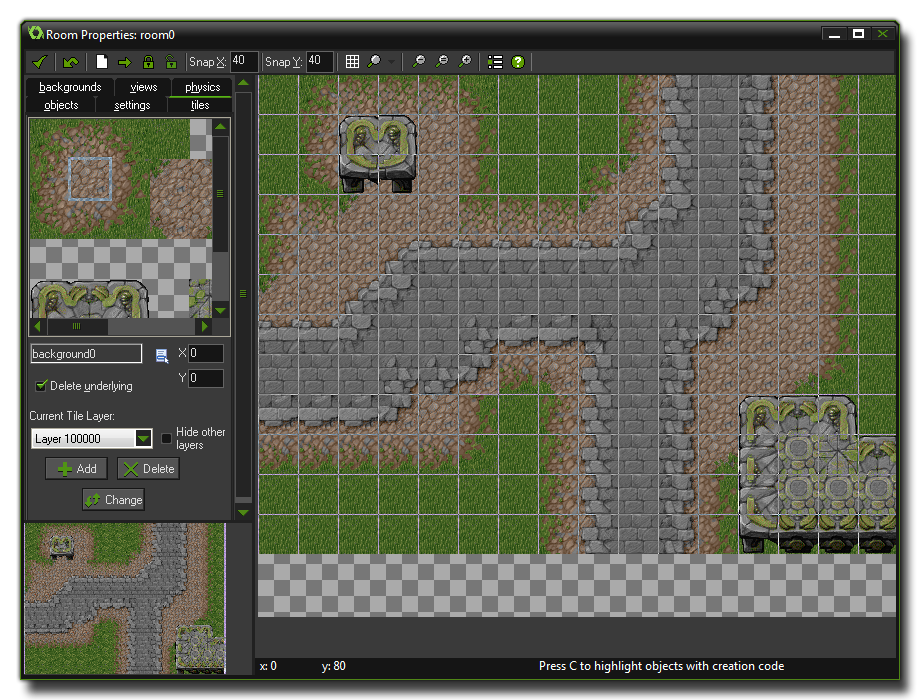 Tiles are a purely graphical
resource that have very few properties and none of the overheads
that accompany an object, and so they are processed and dealt with
much faster by GameMaker: Studio when the game is run on the
target device. A simple tile would be one for a wall in a maze,
where your game has just one wall object with a square sprite
assigned to it for collisions. This object is then flagged as
invisible so that when playing the game you can't see it, and you
would then create some nice tiles that cover the places where the
wall objects are and make your levels look great.
Tiles are a purely graphical
resource that have very few properties and none of the overheads
that accompany an object, and so they are processed and dealt with
much faster by GameMaker: Studio when the game is run on the
target device. A simple tile would be one for a wall in a maze,
where your game has just one wall object with a square sprite
assigned to it for collisions. This object is then flagged as
invisible so that when playing the game you can't see it, and you
would then create some nice tiles that cover the places where the
wall objects are and make your levels look great.
You can use this technique for any graphic that does not have to
change its shape or position (you cannot use it when the image must
be animated - for that you must use an instance), and you can
create some incredibly beautiful graphics for your game with very
few resources just by mixing and matching tiles on each level. It
should be noted that tiles need to be designed properly to work
without any graphical errors and this subject is covered in the
section - More
About Backgrounds.
The Tiles Tab
 To add tiles to your room you first need to add a background
resource to your game that has been properly prepared to contains
the tiles you need, and when adding the background resource
indicate that it must be used as a tile set in the background
properties. For more details on how to load a background as a
tileset, please see the section Using GameMaker:
Studio: Backgrounds.
To add tiles to your room you first need to add a background
resource to your game that has been properly prepared to contains
the tiles you need, and when adding the background resource
indicate that it must be used as a tile set in the background
properties. For more details on how to load a background as a
tileset, please see the section Using GameMaker:
Studio: Backgrounds.
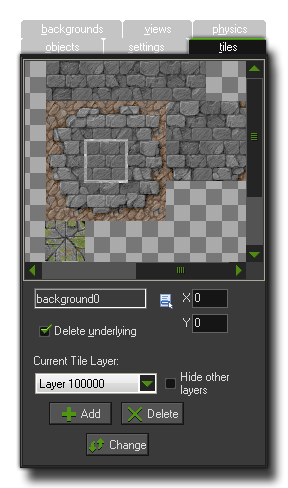
If you look at the tiles tab in the room editor (also shown
above), you can see at the top left the current background being
used for tiling, but this can be changed by clicking on the menu
button underneath. A list will be brought up which contains all the
background resources in your game, and from there you can select
the one you wish to use. Note, that if you select a background that
is not flagged as being a tileset in the properties, you can still
place it as a tile, but it will be the whole image that is
placed, and not just a part.
Selecting a tile and adding it to the room is a simple matter of
clicking on the background image itself to select the part you need
(this will be automatic and depends on the settings of the
background resource), and then clicking in the room on the right to
place it. If you have previously placed tiles at the same place (or
if they over-lap) within the room and at the same depth too, then
the tile underneath will be removed by default, but this behaviour
can be switched off by un-checking the Delete Underlying
box. You can also position the tile using the X/Y input boxes on
the form.
When placing tiles in the room, you place with the left mouse
button and delete with the right, but you also have a few extra
commands:
- hold the <Shift> key to add multiple tiles one after
another.
- hold the <Ctrl> key and click on a tile to move it to a
new position.
- hold the <Alt> key to temporarily switch off snapping to
the gird.
- use the <Cursor Keys> to shift the selected tile 1 pixel
in any direction.
- use the <Cursor Keys> and hold the <Shift> key to
move the selected tile 10 pixels in any direction.
- use the <Cursor Keys> and hold the <Ctrl> key to
move the selected tile 5 pixels in any direction.
- use the <Cursor Keys> and hold the <Shift> and
<Ctrl> keys to snap the selected tile to the nearest grid
position in any direction
If you hold down the <Ctrl> key and right click on a tile
with the mouse, the following menu will open: 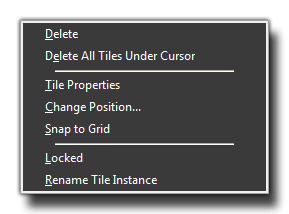 The commands available are very similar to
those that open when you right click an instance and are as
follows:
The commands available are very similar to
those that open when you right click an instance and are as
follows:
- Delete: This will delete the tile at the current
depth.
- Delete All: This will delete all tiles found at this
position in the room (at the same depth).
- Tile Properties: This will open the following window -
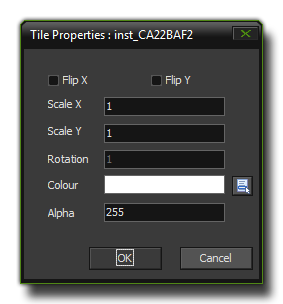 which allows you to
easily change some of the most common tile properties, like scale,
blending and alpha.
which allows you to
easily change some of the most common tile properties, like scale,
blending and alpha.
- Change Position: Opens a window where you can input
precise x and y coordinates for the tile.
- Snap to Grid: This will snap the tile to the nearest
grid square as set by the room properties toolbar.
- Locked: This locks the tile in position and also
prevents it from being deleted. You can unlock a tile again by
re-selecting this option.
- Rename Tile Instance: You can use this to set a constant
which will always point to this tile unless you delete it through
code or change rooms.
In some situations you might want to put a part of the
background tileset in the room that is not exactly the size
of a standard tile, or that consists of multiple tiles, or even one
that is offset from the standard tile grid. Well, this can be done
too! In the top-left background image press the left mouse button
while holding the <Alt> key. Now you can drag the mouse to
create rectangular area, which you can then place in the room in
the same way as any normal tile. If you want the area you create to
snap to the tiles, then hold the <Shift> key instead when
dragging (note that this works best when there is no separation
between the tiles). If you want to select an area that is multiple
of the room grid size, hold the <Ctrl> key rather than the
<Shift> key, and it should be noted that you can actually
change the key you hold during the dragging, which can be very
useful.
Tile Depth
Tiles can be placed in layers at different depths, and if
you look at the bottom of the tiles tab in the room editor you see
the current depth you are placing them at. Default for this is
1000000 which is normally behind all instances (the higher the
number, the further "behind", and the lower the number the further
"in front"). You can use the Add button to add new tile
layers, each with a different depth which you define, and in this
way you can create different layers of tiles, and even objects if
you also give the objects different depths so they are between the
different tile layers. If you press Delete you can delete a
tile layer together with all its tiles, but you must always have at
least one layer, so even if you delete the last one, GameMaker:
Studio will recreate a new, empty one for you again. If you
press Change you can change the depth of a tile layer, which
if you have given it the same depth as another layer, will merge
the two sets of tiles together on the one layer.
Since it can be awkward sometimes to see exactly what you are
placing in the room when you already have multiple tile layers in
the room, you can also check the "Hide Other Layers" option, and
all tile layers will be made invisible except the one that you are
working on. This is purely for ease of use in the room editor and
will not affect how the tiles are drawn in your project.
© Copyright YoYo Games Ltd. 2018 All Rights Reserved