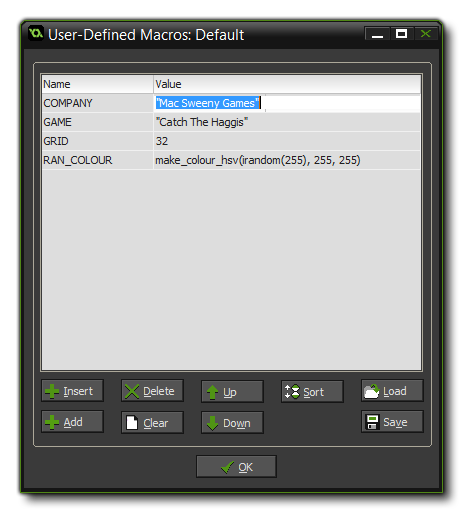
To define macros you chose Define Macro from the drop down Resources menu at the top of the main window (or click on the resource tree icons, as explained below) and the following window will open:
 The main part of this window is
take up with the list of macros, and will start off empty, ready
for you to create your own. To do this you would click on the
button marked Add at the bottom left of the window, which
will then create a new, empty, macro with the Name section
highlighted. You must give all your macros a name, and as with all
things in GameMaker: Studio this name must be unique and it
is recommended that you distinguish it in some way from other
variables, for example, by using all capitals, or by using a suffix
or prefix. Note, that you cannot use any symbols except the
under-bar (_) and the macro cannot start with a number.
The main part of this window is
take up with the list of macros, and will start off empty, ready
for you to create your own. To do this you would click on the
button marked Add at the bottom left of the window, which
will then create a new, empty, macro with the Name section
highlighted. You must give all your macros a name, and as with all
things in GameMaker: Studio this name must be unique and it
is recommended that you distinguish it in some way from other
variables, for example, by using all capitals, or by using a suffix
or prefix. Note, that you cannot use any symbols except the
under-bar (_) and the macro cannot start with a number.Once you have named your new macro you must give it a value. This value can be numeric, a function or a string. For a string it must be wrapped in quotes ("") and if it is a function, it cannot make reference to anything in the game (the current room, instances, or scripts etc...) as the macros are initialised before everything else, but it can however use resources like sprites and objects.
When you have defined a few macros you can use the buttons at the bottom of the window to change them around and add, insert or delete them. Add will add one at the end of the list, Insert will insert the next macro above the current one, and delete will delete the current one. You may also press Clear to clear the whole list of macros, which will open a prompt to ask if you are sure you really want to do that before deleting the whole list. beside these button are two labelled Up and Down which simply move the macros up and down the list, and beside those is the sort button which will put the macros into alphabetical order, with the ones starting with "A" at the top.
Finally, there are two buttons marked Load and Save. With these, you can load into your project macros that you have previously defined in an external editor, or that you have saved from a previous game. If you have already defined macros when you load some from a file, the new ones will be appended on at the end of the list. A saved macro list is stored in a simple *.txt file and can easily be edited and added to by any application that reads these files (Notepad++, for example). You can even pre-define your own text file with a set of macros to be loaded into GameMaker: Studio as the format is simply:
NAME = VALUE.