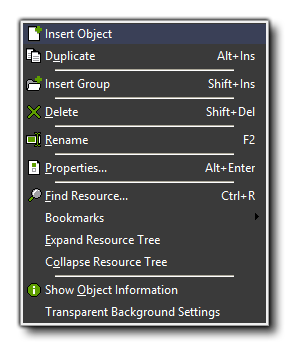
The Edit Menu
Here you can find out all about the various
options available to you from the drop down edit menu.

The edit menu contains a number of commands that relate to the
resource currently selected from the resource tree on the left of
the main screen (object, sprite, sound, etc.). Depending on the
type of resource selected, some of the commands may not be
visible.
- Insert...: inserts a new resource of the type currently
selected. A form will then open in which you can change the
properties of that resource (more on this in the following sections
of the manual)
- Duplicate: This makes a copy of the currently selected
resource in the resource tree. The new resource is given a default
name and a form is opened in which you can change the properties of
that resource.
- Insert Group: Inserts a sub-folder within the resource
tree. This is useful for grouping objects and things of the same
type together for easy referencing.
- Delete: Deletes the currently selected resource (or
group of resources) from the resource tree. Be very careful
with this as it cannot be undone. You will be warned before the
operation is completed and given the option to cancel or go ahead.
It should also be noted that depending on the preferences you have
selected for GameMaker: Studio these resources may also be
removed from the hard-drive.
- Rename: Gives the resource a new name. This can also be
done in the property form for the resource, by right-clicking the
resource with the mouse and selecting "rename" from the pop-up
menu, or by simply clicking the resource again and typing in the
new name.
- Properties: All resources have a properties form that
can be brought up by selecting this command. Note that all the
property forms appear within the main window and you can have open
and edit many of them at the same time. You can also call up the
properties by double clicking on the resource.
- Find Resource: This searches through the resource tree
looking for the name of the resource that you request. This is very
handy when you have a large project with many resources in grouped
sub-folders.
- Bookmarks: From here you can access any of the bookmarks
that you may have set in your code and scripts (you can bookmark a
script or code action using <Shift> + <Control> +
<NUM> , where <NUM> is a number from 0 to 9
on the keyboard).
- Expand Resource Tree: Each section (and sub-folder
within) of the resource tree can be collapsed when not in use to
allow more space on screen for other resources. Click on this to
expand them again.
- Collapse Resource Tree: . Similar to the above, this
command collapses a resource tree section or sub-folder.
- Show Object Information: It is sometimes necessary to
see all the details of an object and its properties in one place,
and this can be achieved by selecting this command. It can be a
very useful feature for debugging and getting an overview of any
object.
- Transparent Background Settings: Here you can indicate
how the transparent area of the sprite and background resources
should be shown in the sprite editor. You can either use a
customizable block pattern, or a solid fill colour which you can
change by clicking on the colour selector box.
Note that many of these commands can also be given by
right-clicking on a resource (or a resource group), and then using
the appropriate action from the pop-up menu.
© Copyright YoYo Games Ltd. 2018 All Rights Reserved
